7 December 2011

Jumpstart your prowess - Turn the dial

A friend recently bought a bridge camera and told me "I just bought this fine camera but I don't know how to use it; so I just set it to auto". So here I am, blogging about how to get to know your camera for the first time.

Any digital camera has a few common features that are easy to understand and use. We get comfortable with a few of those features and stick to them every time we use the camera. I am speaking about the times when we shoot in auto or landscape or portrait preset modes for starters. In this article, I will make a mention of the usual features that a bridge/slr camera has that can be used on and off to take your camera past the AUTO mode.

What is wrong with AUTO?
Shooting in auto is not only the not-so-smart thing to do with a smart camera, it's just so wrong! Would you peddle your way to office seated on a motorcycle? Would you play a mario or tetris on an PS3? Do you watch non-HD content on a heavenly HD tv? If you do, then bhagwan hi maalik hai :o Here are some reasons why you should break free from the nauseating habit of the auto mode.
  • When you shoot in auto, your camera decides the shutter speed, aperture and iso for you. Every manufacturer has its own algorithm to help the camera decide what settings to use in different environments. So with an auto mode, different cameras yield different results. This is why we see manufacturers claiming that their camera is the best in the creed for night shots or that their camera has the best focusing mechanism.
  • Modern cameras have a horde of sophisticated features like face-recognition which get employed for focusing in auto mode. The drawback of this is that if you are shooting a pic of your dog and there is a person in the frame, the camera will focus on the person and you dog might be out of focus!
  • The archilles heel of digital cameras is its focusing mechanism - cameras are blind as a bat when it comes to low contrast or dark areas. Try this in auto mode - choose a plain wall which has just one color and no pattern/design on it (dark or light, doesnt matter). Now try to focus on it. It is highly probable that you will have to try a few times before your camera is able to get a focus lock on the wall.
Switching to manual/priority modes gives you complete control over your camera. Now you won't focus on the stranger in the crowd instead of your sweetheart; you'll be able to capture shots in the dark and much more.

Priority modes 
Aperture (Av)
Use this feature when you want to change the dof and want the camera to choose the shutter speed. This is helpful if the subject is stationary, like a tree or an immobile. The reason the subject needs to be sufficiently stable is that the camera will set the shutter speed to provide a bright picture - it will not care for the relative movement between camera and subject.

Priority mode - Shutter Speed (Tv)
This is used if you want to vary the shutter speed and capture a fast moving object or slow down/create blur in your images. The camera will choose the aperture that provides a bright enough picture, thereby claiming control over the dof.

Manual Mode (M)
In this mode, you can alter both shutter speed and aperture. This mode gives you complete control over the camera. Most photographers always shoot in this mode.

Preset Modes
Portrait Mode
This can be used to click close-up photos, the kinds that you would click if it were a portfolio shoot. In this mode the camera uses shallow dof, thus rendering the background out of focus and giving a portrait effect.

Landscape Mode
This does the opposite of portrait - it uses a deeper dof thus keeping more objects in focus. This is necessary when you are clicking a pic of a wide area, a street view or the horizon wherein the objects in the frame are placed at different lengths from each other.

Snow Mode
This mode uses settings that compensates for excessive reflected light. This is useful to avoid overexposure due to the light reflected by the snow around you. You can take care of this using manual settings also, but as compared to an auto mode, this is a better choice in snowy conditions.

Sports Mode
This mode simply increases the shutter speed so that you can freeze a fast moving object like a car or a running person. You can increase your chances of getting a sharp pic in any mode by employing the art of panning.

Macro
All cameras have an ideal distance range in which the subject should be, for sharp images. If the subject comes too close to the camera, you would need to shift to macro mode or change the lens itself to a macro lens. Macro mode in cameras is used to let you get up close (and personal?) with the subject. This is useful if you want to click a lifesize pic of a housefly or a millipede. But macro mode by default switches to shallow dof and is prone to camera shake.

I hope I have been convincing to some extent, in my argument against the auto mode. The only way to enjoy your camera is to go manual; auto is for your amma appa :)
Happy clickin!
Sid

24 November 2011

The stuff that good clicks are made of

The reason photography is classified under arts is simple - it is subjective. You cannot define a good photograph - you can only define your idea of a good photograph.

I was once asked to explain how I would differentiate a good photograph from a mundane or bad click. In return, I asked her whether she preferred a beer mug or a wine glass for drinking water. She chose to drink in the beer mug. I told her that I would personally prefer the wine glass. Whose choice was correct? Neither was wrong I would say. The wine glass appealed to me - maybe out of habit or out of social norms that beer is usually served in a beer glass while water can be served in wine glasses. But why did she choose the beer glass I wondered. She had no logical explanation for it - it was 'her choice'. And that was my explanation to her question - it's an individual's choice!

So why did I blabber about this incident you may ask? I did it to simply prove a point - art is subjective; our appreciation of a work of art is based on our perception of that piece. We often hear about masterpieces from Picasso or Da Vinci and wonder what separates these works of art from the creations of other artists. While I or you may not be able to decipher the works of these masters, there are those who will do anything to have these in their list of prized possessions. So you see, my idea of good photography is MY IDEA - you may not disagree with it; or you simply might. So I am going to try laying down my idea of a good click, hoping that I can get feedback on and will be able to improve my criteria for a good capture.

1. The message
You pen your story not with ink, but with color & composition. What story is your image narrating? What are you attempting to depict through your clicks? It shouldn't be a day's work for the viewer to figure out the message in your photographs.


The image of the left has two possible subjects - the setting sun and/or the bike. Both could be the subjects in the image but since the bike is not completely inside the picture, the message is not clear. What are you trying to say? "guess the bike?" If yes, then what is the beach/sunset for?

The image on the right provides more clarity on the message - it screams "check out the bike with the beach/sunset backdrop!".


2. Step out of the crowd
Be different, be yourself. Admiration for your favorite artists should not creep into your style in the form of blind imitation. Create your own style. We all know how much we adored Anu Malik's blatant plagiarism :)

3. What am I lookin at?
Your image should guide the viewer to your subject in it. If the viewer is struggling to locate the intended subject in the image, obviously he/she will run into bad weather trying to get the message of the photograph. Cut him some slack, don't make him work for it.

4. Dump the clutter
Try to get rid of matter not relevant to the subject. For example, if your image is aimed at showcasing the beauty of a car then get rid of the bits of paper or any other disturbing artifacts/people in the frame before you compose the image.

5. Hold it steady
When not using a tripod, it is easy to introduce camera shake into the picture, especially in situations of low light. Though it may look sharp on the miniature display that your camera is equipped with, it maybe a completely different story altogether on your computer screen and worse - in prints! So make it a habit to keep your hand steady.


6. Colorful or colorless?
Try to take pictures in black-and-white. While you also have the option of shooting in color and then converting it to b&w during post-processing, shooting and reviewing in b&w on the camera gives you a completely different experience - that of judging light.When we shoot in color, we usually pay attention to the colors in the frame and not the light. Shoot in b&w every now and then - either to understand light or simply to break the monotony.


This image has no post-processing done to it. This is a shot of a dining table in a dark restaurant. The table had a dim overhead lamp which lit a minimal area over the table. Shot in b&w, I really liked the effect.


7. Post-processing - now even you can fake it!
Why do most contemporary photographers indulge in the highly debated act of post-processing? That is because they want to bring the mental picture to life. If you were an artist who painted with a brush, you could have used the colors that you wanted and bring your imagination to life. With a camera, alas, not everything is in your control. People don't smile, don't look in the right direction, don't wear the right clothes or everyone is just having a bad hair-day! Whatever the case, you are unable to compose the scene to suit your mental picture. Fikar not biraadar! Tools like Adobe Photoshop, GIMP (open source & free), Adobe Lightroom (RAW file processing) are here to help you bring your imagination to life :) 


But don't overdo it. An image should at best, look "polished" but not "altered". Nobody likes to look at a picture that has "what you see is not what it was" written all over it. In the below images, the one on top has mild saturation applied to it to bring out the green. The bottom image on the other hand, has gone overboard with the saturation slider and screams "fake! fake!". Resist the temptation to post-process to such a point.


So those were some guiding lines followed by me when I have to decide a good image from a bad one. Note that the above guidelines apply more to personal/artistic clicks and need not be valid in the commercial field. For example, post-processing is part and parcel of commercial work. If it weren't, believe me, your simple girl next door would make more heads turn than all the Katrina Kaifs and Bipashas combined :)

20 November 2011

Jumpstart your prowess - Lets get technical

In this post, I would like to discuss the technicals of photography - aperture, shutter speed and ISO. It is important for you to get a fair understanding of how these parameters affect the final image that is clicked on your camera and how these collaborate or interfere with each other.

If you have a bridge/SLR camera, you should try playing with these parameters and see how they help you bring your mental picture to life. Some compact cameras do allow you to change ISO I guess but asli maza toh SLRs mein hi ata hai :)

Shutter Speed (Tv on Canon mode dial)
This parameter refers to the amount of time for which the camera body shutter remains open and lets light fall on the sensor. The sensor then saves this incident light pattern as an image. The longer the shutter remains open, the more the light that gets collected by the sensor and hence, the brighter the image. 

Image Courtesy: Howstuffworks.com
The above image shows a skeletal structure of the mirror+sensor+shutter+pentaprism arrangement inside a camera body. The mirror helps you see through the viewfinder, what the camera sensor will see when it is capturing the image. When you click to capture the image, the mirror falls back and becomes parallel to the base of the camera, thus allowing incident light to fall on the sensor rather than bouncing off to the pentaprism. At the same time, the shutter moves out of the way and stays out for as long as the shutter speed that you have set. The sensor then saves the incident light as an image. If anything in the scene that is being captured moves, this will create a blur or a ghostly trail in the saved image. I find it difficult to explain this verbally so I would suggest that you look for video explanations in youtube.

Some sample shutter speed values are 1/8000, 1/4000, 1/1000, 1/500, 1/250, 1/125, 1/60, 1/30, 1/15, 1/8, 1/4, 1/2, 1 or -1, -2 etc. On your camera display, the shutter speed maybe displayed as 60 instead of 1/60, and so on. This means that as you move towards the right of the above series, the time allowed for the shutter to remain open keeps decreasing and hence, the amount of light available for the sensor to capture keeps reducing and the image becomes darker. If you need to freeze a fast moving subject and capture a crisp, sharp, focused image of it than you need to increase the shutter speed (reduce the time for which it remains open). This is what your preset SPORTS mode does internally.

Alternatively, if you reduce the shutter speed (keep the shutter open for longer periods of time) then though the image will be brighter due to more incoming light, any shake in the camera or visible scene will lead to a blur in the captured image. This is what happens in most night-shots wherein you are forced to reduce the shutter speed to compensate for the lack of lighting and the subject moves. Light painting is a field of photography that stems from this concept.

Light Painting
In the above light painting image, a simple led torch has been employed to paint wings around the subject while the shutter was kept open for 20 seconds. The below images also have long shutter speeds but cannot be classified under the light painting style since the photographer has not "painted" with his own source of light like a torch/candle.


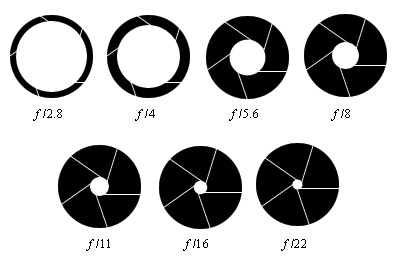
Aperture (Av on Canon mode dial)
It is mentioned in terms of f-stops or f numbers and refers to the lens diaphragm opening inside a camera lens. The aperture determines how collimated (parallel) the incident rays are. A smaller opening lets in rays which are highly collimated. This in turn produces an image which is sharp throughout. A wider aperture lets in rays at different angles which when tried to focus onto a single area on the sensor by passing them through a lens mechanism, do not provide an evenly sharp image. This phenomenon is used in portrait photography wherein you want the subject (bride/groom for example) to appear sharp while the background appears out of focus.

Image Courtesy: geekinspired.com
To understand more about how an aperture affects the dof (depth of field), I suggest reading up on pinhole cameras (also called Camera Obscura) here. It beautifully explains the technology behind camera optics. This article explains the concept of lens aperture in a bit more over-the-top fashion :)

As of now, it suffices to understand that aperture is used to control the dof. A value of f 1.8 means f/1.8. Hence f1.8 is a wider aperture as compared to f8.0 and produces shallow dof.


The above image was clicked at f3.6. Notice that the golden bangles at the forefront are in focus and are sharp while the blue bangles in the background are out of focus. Had the aperture been smaller (f8.0 or above) then both set of bangles would have been in focus.

An offshoot of aperture settings is its effect on brightness of the captured image. Since the aperture setting modifies the size of the diaphragm through which light enters the camera, a shallow dof means a larger opening which means more incoming light and hence, a brighter image. As you reduce the shallowness of the dof, the image will keep getting darker thus requiring you to reduce the shutter speed to maintain the brightness levels.

ISO
This is a concept carried forth into the digital era from the age of film cameras. In the days of yore, films were made for different sensitivities to light and were accordingly awarded ISO grades. A film of 80 ISO was less sensitive to light as compared to a film of 200 ISO. Hence, a picture shot on a 200 ISO film with shutter speed x and aperture y would look more bright as compared to that shot on an 80 ISO film with the same settings.

In digital cameras, the ISO effect of the film era is obtained by amplifying the electrical signal received from each pixel before it reaches the processor. Read the below posts to know more about this.


ISO settings in digital cameras do not have an optical background unlike shutter speed and aperture. ISO settings in digital cameras have an electronic explanation as can be seen from the above two links. Hence, the ISO performance of different cameras differs. This takes me back to my article on comparison of cameras wherein I stated ISO as a parameter on which cameras should be compared. For example, a Nikon D3000 starts introducing grain into images even at ISO 400 whereas a Nikon D7000 can be pushed upto 1600 ISO for the same settings of shutter speed & aperture to provide almost no noticeable grain. This is a result of superior electronics/hardware and is not related to the optics (lens).


As you increase the ISO, the image starts looking grainy/noisy. The noise is more noticeable in darker areas of the image. Hence, if the ISO is increased in situations with fair amount of light, it makes the image brighter but doesn't really introduce much noise. But in darker areas or at night, high ISO will make your image brighter at the same shutter speed & aperture setting while introducing noise at the same time. As explained in the above two links, better camera hardware leads to less noise and hence, costs more.

What/when/how?
Now that you have a basic idea about the three parameters, lemme tell you how to use this newfound knowledge to achieve the desired results.

* Increasing brightness
  • Reduce shutter speed: try to keep the shutter speed above 60 (for example, 80, 100, etc). Even in sufficient lighting, setting the shutter speed below 60 will introduce blur. In case you are reducing the shutter speed, use a tripod to keep the camera stable. Alternatively, you could place the camera on solid ground like the floor or a table to avoid camera shake. As for the subject, make sure that the subject is stationary and that there is no movement in the scene being clicked. This works well for structures (buildings, statues) but is difficult if the subject is a person/animal/plant and the night is windy.
  • Increase aperture: this means reduce the f value (for example, f1.8 is a bigger aperture than f8.0). While aperture is used for controlling dof, it also affects brightness of the image.
  • Increase ISO: since this artificially amplifies the signal sent from the pixel to the processor, any prevalent noise in the signal also gets amplified thus leading to grain/noise in the image. Know the ISO durability of your camera since each camera model has its own ISO performance.
* Changing the dof
  • aperture is the only setting that can be altered for changing dof. Remember that changing dof also changes the brightness of the image
* Night photography
  • reduce shutter speed (use of tripod recommended to reduce/prevent blur)
  • use artificial light source/flash: I personally avoid the flash as much as possible since it hampers accurate collection of colors. But you can reduce the shutter speed and use flash at night. This will lead to lighting-up of the subject while also capturing true colors of the areas where the flash has not been able to reach (the background). Check the image below which has been clicked through this technique.


In the above image, you can notice the light shining off the metal bars at the lower area of the image. That is the light from the flash. While the flash fires off in the beginning and lights up the areas on which it falls, it doesn't reach the background which is miles away in this case. Since the shutter speed was 10 seconds, the camera got sufficient time to capture the background light and hence, the true colors of the background were successfully captured.

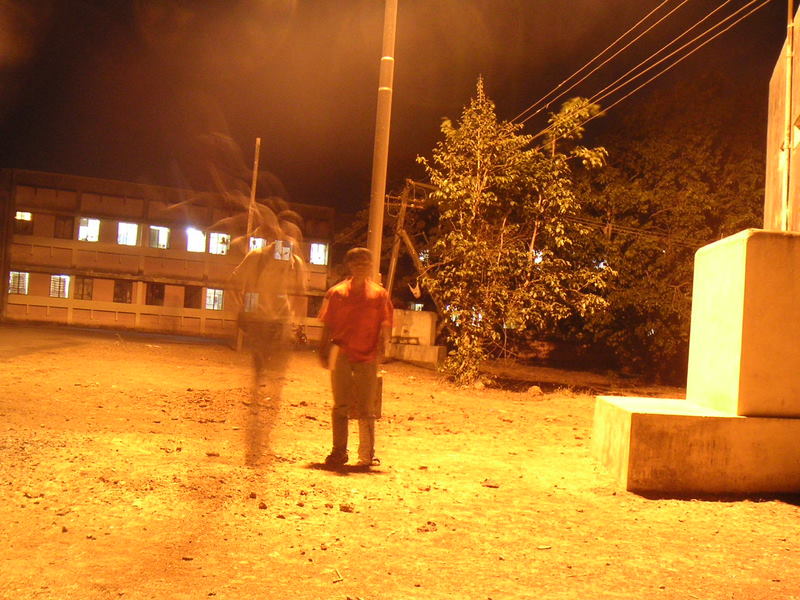
* Light/Ghost photography
  • Ghost Photography is a type of night photography in which the shutter speed is reduced so that blur can be introduced using bright objects against a stationary or dark background. In typical ghost photography for example, you would set the shutter speed to slow values so that a person moving around at a quick pace would appear ghostly. Check the below image for example.

In this image, the person on the left sets the camera on a tripod and walks from the camera to the subject while the camera is capturing the image. The shutter speed was set to more than 5 seconds.
  • Light photography/painting is simply painting with light. Set the shutter speed to slow values so that the camera keeps capturing the image infront of it. During this time, point a torch or any other light object towards the camera and move it around. Whatever the pattern traced by the torch, is saved as an image as if you painted with light instead of with a color brush :) You can search for tutorials on light photography in youtube. There are loads of tricks explained there.
Is there some special equipment for night photography?
No! You can buy lenses with bigger apertures (f1.8 for example) or you can buy camera bodies which have better performance at higher ISOs. Full frame cameras have better ISO performances for example. There is no special lens/camera architecture that is built for night photography as such.

There are many more tricks that you can try with your camera. But then, how well your camera supports your kida-ambitions is what makes it a good camera. I hope now you understand why I was speaking about deciding on your passions and ambitions before buying a camera. If you want to try out the above tricks, you would need a camera that allows you to try em. Else, just carry a compact camera which is good for your point-and-shoot needs.

Happy Clickin!
Sid

17 November 2011

Jumpstart your prowess - Composition

Greetings dear photography enthusiast! 

I hope my posts have been entertaining as well as informative for you until now. Having cleared misunderstandings and myths regarding camera equipment, I believe it is time I got down to talking about photography and moving away from the topic of equipment for a while.

So you are all geared up to take up the challenge of mastering the art eh? Glad to hear that. Keep that josh simmering my friend, cause no reward is greater than the fruit of a pursuit of excellence!

Let me talk about a few fundas of photography to get you started. This post is aimed at novice enthusiasts who are wondering if they are on the right track of learning. So I will try to keep it very basic and explanatory with lots of links to articles as and where necessary.

This post will explore the concepts related to image composition - what should and what shouldn't be in the frame.

Rule of thirds
A very commonly discussed rule in creative circles is the rule of thirds. This is not a rule per say, rather a guideline to help you compose/frame your pictures to make them look appealing and to add a sense of subject and message to it. Of course, as a creative person you are not bound by rules and hence are free to make your own rules or to not follow suggested approaches but then, the rule of thirds is a very common rule that does give birth to deeply communicative images. Some articles claim that research has yielded evidence of the fact that when most people look at an image, their eyes start at one of the four focus points that the rule of thirds yields. This theory completely applies to me and hence, I believe that this rule is not a hallucination of an intoxicated artist but is in fact, based on factual observations.

So what is this cosmic rule of thirds? Its very simple. Divide your image into 3x3 sections so that you get 9 cells as shown in the below image. The 4 intersection points formed around the central area of the image are the focus points that I was talking about. Chances are, placing your subject at one of these focus points will make the user note the subject before he/she notices anything else.

Image Courtesy: slideguru.com
Check out the set of images below. The one of the right follows the rule of thirds. Which one would you have shot?

Image Courtesy: Wikipedia

Which of these images looks more appealing to you? I personally prefer the one on the right. Coincidentally, this image follows the rule of thirds. You will notice that the one on the right is a little lower than the other one and is shifted towards the left. This removes the unnecessary brown sand at the bottom of the screen and brings the focus on the towering rock which was the intended subject even in the picture on the left.

As I said before, the rule of thirds is just a guideline that you should be aware of. The appeal of the image is not dependent on this rule. Listed below are some images which follow/don't follow the rule of thirds.


The above image follows the rule of thirds. Notice how the attention is drawn not only to the person standing in the image but also to the sky and the landscape. As can be inferred from this, the rule of thirds can be used to draw attention to the environment of the subject (the landscape/friends/objects around the subject) while also drawing attention to the subject.


The above image defies the rule of thirds because the aim of the photographer is to draw attention to the subject only. Had the subject been shifted to one of the corners, the viewer would have been confused as to what the photographer wants to show besides the subject since there is no concrete/beautiful scenery in the vicinity of the subject.

Depth-of-Field (dof)
Dof is the width of the plane near the subject, that is parallel to the surface of the camera lens. Look at the illustration below to understand this definition. dof is varied by altering the aperture setting of the camera. Aperture is measure in f-stops. For example, f1.8, f3.6, etc. f1.8 provides shallow dof as compared to a higher number like f3.6 and so on.
In the above image, the gray area is the dof around the subject. Objects outside the dof will not be as sharp as the objects inside the dof and the level of sharpness in these objects will increase with their distance from the dof area. For example, a vase placed just outside the dof area behind the subject will be a bit less sharp while a vase placed 5 metres behind this vase will be quite out of focus. When the dof plane width is small, the term used for such a setting is "shallow dof" since the area in which the image is sharp is shallow/small. "Increasing the dof" means increasing the width of the dof plane.

Please not that the dof plane is always created parallel to the surface of the lens. So if you have a string of people standing in front of the lens at varying perpendicular distances from the lens and you focus on the person in the middle of the lot, all those who are in the dof plane will appear sharp in the image. People who are a step or two forward or behind the person in the middle will start appearing out of focus.

Dof is most useful and produces appealing images during portfolio shots where you want to focus on one person in a crowd. This could be the groom/bride or even just the wedding ring. One of my favorite wedding photographers Joseph Radhik routinely employes the dof funda to his image to produce fantabulous results!

Notice that the background in the above image is out of focus. This is because of shallow dof. As mentioned above, shallow dof produces awesome effects in portfolio shots.


Reduce clutter
Do not stuff your image with too many subjects. Keep it clean. When I look at your image, my eyes should not wander around in search of the subject. Your image should guide my eyes to your subjects. For example, I consider the below image cluttered. I cannot decide what or who the subject is.
Image Courtesy : tibetanwomen.org
In the below image, we know what or who the photographer is trying to point at. It is the six people in the image. There is no other subject/distraction in the image that can make you think otherwise. Of course, this is a studio-staged image and hence you could do away with the clutter and this is usually not possible in candid pics like the one above but nevertheless, I have used it to explain the difference that clutter makes.

Image Courtesy: Wordpress
Notice that even if you have clutter in the image, you can shut them out of the viewer's focus area by either darkening it or by blurring it. These are post-processing options which are to be the last resort and should not be considered while clicking the image.  Below, the image on the right has a background that distracts the viewer. The one on the left has that background darkened out in post-processing to help the viewer focus on the intended subjects - the bells.


Silhouettes 
With respect to photography, a silhouette is identified as a dark image outline against a brighter background. For example, the dark, unrecognizable snapshot of a person against the orange setting sky in the evening. Silhouettes create a mystic feel about the identity and persona of the person being included in the image and usually leaves it to the viewer to draw a meaning out of the image.


Seedha ya tedha?
Here I am talking about shooting an image in portrait or landscape mode. You need to use your own judgement of what would capture the subject properly and convey what you want to. Check out this article on this topic. A landscape image has the capability of showcasing more the the situation and hence provided a more complete picture whereas a portrait image has the capability of showcasing few selected subjects that you want the viewer to focus on. Depending on what it is that you want to portray, choose the mode. Once again, either mode may produce a good image but both modes may not convey the same thing or make the user see the same thing that you want them to.


In the above image, much of the detail to the left of the scenario has been lost because the photographer tried to include the subject as well as much of the background on the right. This has been corrected by moving a few steps back and capturing a portrait shot instead. The portrait shot makes the subject look smaller as compared to his surroundings but looks much more visually appealing and more importantly, complete.


Leading Lines
I don't really know how to best explain this concept. It is about using lines or structures that form a linear arrangement which give the viewer the idea that the photographer is trying to point towards something using the subjects in the image. Check out the below images for example.


Point of view concepts
There are different positions in the room that you can capture the subject from. You can lie on the ground, or kneel, or climb up a ladder, or get behind the subject and show his/her back instead of the face and other innumerable positions. Here is a wonderful and somewhat comprehensive article on this topic. Try not to be monotonous in your point of view. For example, I see wedding photographers permanently perched in front of the wedding podium clicking pictures from just one position throughout the wedding. I have no interest in looking through the same angle throughout the entire album. The album should give me a tour of the wedding day. And a tour requires the camera to move from one position to another. So my word of advice is - move your feet, roll in the muck, climb the trees and break the cliche.

So these were some of the composition related concepts that I could delve upon at the moment. There are many more but they are better left for another day. I hope this article adds to your creative mind and helps you be artistic with your captures.

Happy clickin!
Sid

16 November 2011

Blasting the myths - Is it wise to go gaga over camera phones?

Was it ever? No it wasn't. Sure, high-end camera phones do provide superb pictures in well-lit areas. But they are still bogged down by problems inherent in such small compact devices, which will always make them inferior to dedicated image-capture devices (I hope you get the gist...am talking about cameras).

I have seen people go head over heels while praising their camera phones. The praise showered by them is usually made up of phrases like "you know...my cell has a 5mpx camera!" or "this is the latest camera phone in the market...and one of the most expensive too" and of course, the unmistakeable "my camera has a Carl Zeiss lens". I wonder what fortunes Carl Zeiss is showering on these camera manufacturers for their marketing blitz against innocent consumers. But then, such naive consumers always have it coming :)

Ok so what's wrong with your camera you ask? You paid 30k for a camera which does not qualify in the arena of compact cameras in the 10k bracket - that's what's wrong with your uber-cool camera phone. And to think, the device that you had actually set out to buy was a device that can make calls and send text messages and has a long battery life :)

Camera phones have a set of problems which have been prevalent to some degree since the inception of such phones. Some of them are explained below. I don't expect you to shun camera phones after reading this post; I just want to open your eyes to less-discussed facts about such devices so that you may not have unrealistic expectations from your big-budget phones.

* Shutter Lag
Camera phones do not have a physical shutter. This means that the software in the phone tells it to capture light for a specific time and save it as an image. This time difference between pressing the button & the image actually being clicked is called Shutter Lag. Even good phones have sufficient shutter lag in them.

The problem with camera phones is, the slower the hardware of the phone, the slower the image capture. Besides shutter lag, slower hardware will mean the image capture will take time and the saved image will be blurred. This means that in case of insufficient lighting (even if you are standing in the shadow of a structure in broad daylight, the lighting maybe insufficient for your camera) you would need to hold your hand still (and that applies to the subject as well) to avoid blur.

* Lens construction
Unlike in digital cameras, most low-end camera phones employ plastic or bad quality lenses which render your pride-instilling megapixels useless. Here, I would accept, that beating the "Carl Zeiss" drum actually makes a bit of sense :)

* Flash
Most camera phones have LED flash which is as good as nothing. I remember Sony Ericsson phones were packed with Xenon flash units which were bright and actually played the role of a "camera flash". So if your phone has an LED flash, just go bah! at it and turn around.

* Zoom
Most camera phones lack optical zoom and provide only digital zoom. Digital zoom is a stupid funda; the idea is so stupid that it works in hypnotizing most buyers! :) Optical zoom requires you to physically alter the position of elements within the lens by twisting the lens (in case of SLR cameras) or by using the zoom in/out buttons (in compact cameras). Digital zoom simply crops the image so that it looks big/zoomed-in. Try this on your PC - open an image in mspaint and use the select tool to select a rectangular portion from the center of the image. Use this as an image and repeat the process atleast 3 more times. What you see is what digital zoom gives you - a cropped, bad resolution image. In this case, the sensor is the same but the image is a cropped & zoomed-in version of the one that you would get without any zoom on your camera phone. See below illustration.


* Small sensor size
As explained in another post, stuffing 12 mega-pixels (Nokia N8 boasts of this one) on a small-size sensor will not yield the same quality as a 12 mpx sensor in a digital camera does. So the next time you hear someone boast about the number of megapixels in his camera phone, give him a knock on his head on my behalf :)

Conclusion
So why do I have a problem with camera phones you may ask? It's not that camera phones are evil; they are simply overpriced. But that doesn't refute the fact that they are convenient and handy. In fact, this article provides researched data that more than 70% of cell phone users claim that they bought the phone because of the camera in it. My occasional rant on this aspect of buyer behavior is directed at buyers who buy a 30k phone for the camera in it when they can easily buy a better digital camera for one third the price and buy a decent phone for a few bucks more. At the same time, I do agree that having a good camera with you at all times does have its advantages. Well, my intention was to bring the facts forward and clear the air about fancy camera phones and clarify that they cannot match up to digital cameras.

Here is a list of camera phones which have performed well in the labs. Nokia N8 tops the list, followed by iPhone 4s and Samsung Galaxy S2. So if you still are crazy about expensive camera phones, these are the ones that your eyeballs should be playing ping-pong with :)

Happy clickin!
Sid

14 November 2011

Blasting the myths - Comparing cameras

This post is about comparing cameras and reading between the lines of any offer/marketing campaign. Manufacturers/retailers often take buyers for a ride by focusing on irrelevant aspects of the equipment. Come on! No manufacturer/retailer will tell you that lens a which seems to be similar to lens b is better than lens b and at the same time, is cheaper too! How then would you weigh the equipment and see if it suits your needs? Lemme suggest some facts to look out for.

The more the megapixels, the better is my camera!
WRONG!! 'Megapixels' is neither the muscle nor the brain of the camera. The heart and soul of the camera are its sensor and lens. But the manufacturers always market a camera on the basis of megapixels and the brand of the lens. Occasionally, some camera models are marketed on the basis of additional features like shooting modes (night mode, etc). Do you see posters claiming that this camera has a such-and-such sensor and a lens of this construction? No! The reason is simple - it would either confuse the casual buyer or it would make the moderately serious buyer wise and help him/her choose the best :) 

Here are some articles that explain this concept beautifully. The second article illustrates the entire concept of megapixels, dpi and print sizes with amazing simplicity and depth. I suggest that you read it patiently and completely. You will definitely have a bone to pick with every person who pushed you into the megapixels race :)


Besides the fact that each image resolution has a best maximum-print-size, "Pixel Pitch" is a concept that should convince you to step out of the megapixels race. Pixel Pitch refers to the size of the pixel on the sensor. Take a sensor of  2x2 inches (these are dimensions quoted for this example and do not refer to actual dimensions of any existing sensor to the best of my knowledge) and stuff 1 mega-pixels in it. Now compare this to another sensor of the same dimensions loaded with 10 mega-pixels. The latter will obviously have pixels which are 1/10th the size of those on the former. These pixels would absorb less photons and hence generate a weaker electrical signal which is sent to the processor for composition of the jpeg image. Since the signal is weak, it needs to be amplified. Artificial amplification of this nature, engineers would agree, introduces noise in the signal and hence, in the image that is saved. Hence, cutting the long explanation short, more mega-pixels on the same sensor size would lead to degraded performance. By now, if you are still reeking from the hangover of more mega-pixels, you have foresaken the right of blaming your wife for your depleting bank balance :)

To conclude, do not set mega-pixels as the main ground for comparison between two cameras.

This has a Carl-Zeiss Lens
Ok I don't really see how having a Carl-Zeis lens makes me cast all other options aside and run into your arms! I have not seen any Sony poster try anything besides this for the past few years. Look at Nikon - atleast they have Deepika rooting for them :p As for Canon, they countered Nikon's hottie with the Indian maestro of cricket - Sachin. Cmon Sony...catch up!

A camera lens is a sophisticated piece of engineering with multiple high-quality elements built into it. Determining the performance and grade of a lens is a complex process, best left to professionals. You should read up on reviews by camera magazines/websites to understand the performance of the lens in question. A very reliable and popular website for photography reviews/tutorials is Digital Photography Review. The lens elements and its architecture determine the performance of the lens, and not the brand name of the manufacturer. For example, though it may be a lens from a reputed manufacturer, it may not be a good performer at the telephoto-end or the wide-end or in the mid-zoom-ranges or it may not focus in low-light conditions.


Image Courtesy : artandstructure.com
Sensor Size
Camera sensors come in different sizes. The most basic differentiation is full-frame and cropped sensors. A full-frame sensor has almost the same size as that of a 35mm film frame. A cropped sensor is smaller in size. If you read up on Pixel Pitch, you would understand that sensor size greatly affects camera performance. In Nikon, the cropped camera bodies carry the prefix "DX" while full frame sensors are labelled as "FX". Canon uses the terms APS-C and APS-H respectively for the same.
Batteries
I personally do not prefer pen-cell batteries. They wear out soon and it is difficult to find the right charger-battery combination when you need to. What I mean is, though I may buy a Eneloop battery and charger combination this time, on a trip I might buy another brand of batteries or may forget the Eneloop charger and end up buying a different brand of charger. Contrary to popular belief, for long life of your rechargeable batteries, use them with their brand of charger. Do not mix batteries of one brand with a charger of another brand. Also, choose NiMH batteries over the NiCd which are banned due to their toxic nature.
 
ISO Performance
Compare cameras on their ISO performance. Better cameras offer less noise at higher ISOs.

List of accessories that can be coupled with the equipment
Some of the accessories that you can couple with you camera are remote trigger, flash, filters, list of lenses, tripods, spirit gauges, camera bags, camera body protection covers, etc. For example, some cameras do not allow you to attach a flash light onto the camera. Look out for these details. Some cameras don't even come with a built-in flash.

Continuous click speed
If you are interested in click images in burst mode (in this mode, the camera keeps clicking images at a fast rate until you release the shutter button or until the continuous-click limit has reached), then you should look at this rate. The higher the rate, the more the shots that can be clicked in quick succession. This is useful for example, if someone is diving into a pool of water and you want to capture the transition from the diving board to submersion.

Dioptre Correction
This is useful for you if you wear specs. The dioptre can be calibrated by you so that you can look into the viewfinder without wearing your spectacles. This is very helpful during long durations of a photo shoot session.

Image Resolution
Look at the maximum image resolution that the camera can produce. Choose the one with the higher value.

Viewfinder/LCD Screen coverage
This is the amount of area that the screen/viewfinder lets you see. For example, if this value is 98% for your camera, it means that what the screen/viewfinder shows is 98% of what will be saved in the captured jpeg. Hence, this can interfere with your judgement what should go into the final jpeg. An occasional foot of a passerby or a blurred wagging tail of a mongrel would eventually irritate you enough to swear in the name of your innocent camera :)

Supported Memory Card
If you already have a set of extra SD memory cards, why chose the camera that supports only the other type of memory card over the camera that works with SD cards? There better be a good reason if you still choose to go for the other camera.
Video Capabilities
In case you want your digital camera to work part time as a video camera, then compare the video capabilities of the options before you. Look for video resolution, maximum video length, stereo sound support. These days, most cameras boast of HD video. Believe me, HD is awesome! Read up on HD here.

Live View Mode
Not all cameras support the live-view feature wherein you can see the image in the screen before you click the image. In most entry level DSLRs, you need to look through the viewfinder to see what the camera is seeing. The LCD screen in such cameras is used only to see the saved image and browse through settings.

Here is a comprehensive list of camera attributes that you can look at while comparing two cameras. You would seldom find these details at the retailer's outlet and would need to read up on the internet before heading out to the store. This is another brief article to help you understand that you should not go by the manufacturer's words.

Setting the foundation - "Where should I buy it from?"

An anxious call from a friend gave me the idea of this post. This is a short write-up on my take on one of the big questions in any retail customer's mind - the point of purchase.

Options
The very obvious options available to you are listed below. You can also rent equipment for short-term needs. I would not list it as an option right now since I am assuming that you want to "own" the equipment and are not looking for temporary/per-assignment solutions.
  • Online
  • Retail Store
  • Used equipment
  • Jugaad 
  • US se aya mera dost 

* Online
There has been an explosion of e-commerce websites that claim to offer the best deals across the spectrum of electronic items. Some of the websites with a good collection of camera equipment are Zoomin, JJMehta, eBay, Rediff. JJMehta has a reputation in Mumbai as the retailer with the best collection and prices.You should look at eBay, Rediff-Shopping and other e-commerce portals from time to time for offers or simply to be aware of the prices at which products of your interest are being traded. Purchasing over eBay is completely safe provided you study the retailer/seller before you place your order with him/her. Here is an article on precautions to be taken before placing an order on eBay and other e-commerce websites. Please do not get scared after reading the article; its only a guide to safe shopping. Most of the ideas expressed in the article on eBay shopping precautions can be applied to the practice of online-shopping in general.

Join the facebook/twitter pages of manufacturers like Nikon, Canon, Sony, etc to look for offers/contests/coupons/vouchers which can land you a discount voucher.

And there is always the option of participating in online contests to win your equipment :) Cameras are increasingly becoming the popular choice for gifts in most online contests. 

Pros: easy to search and compare; option of cash on delivery
Cons: not the best prices usually; waiting time till delivery

* Retail Store
Though this may seem to be the simplest option, a shrewd buyer would need to walk across town and visit multiple stores to get the best deal. Camera equipment usually exchanges hands at a heavily discounted price. Retailers also throw in memory cards and camera bags/tripods if the buyers haggle for 'em. To give you a rough idea of the degree of discount that you can achieve, the MRP for a Canon is Rs. 39,000. I bargained for a camera bag and a 4gb memory card and eventually signed the bill for 36k at a retail outlet, only to realize a few days later that another retailer's quoting price is 36k for the same deal. Had I been patient and checked a few other stores, I may have hit upon a better bargain. Every city has its set of preferred/popular camera retailers. Try to locate these for starters as they would try to understand your requirements and offer you genuine advice on different cameras.

Pros: usually gets you the best prices in the city; optimal for those who love to bargain :)
Cons: walking around in search of the best deal

* Used Equipment
In any electronic device, the moving parts are the ones that are susceptible to wear-and-tear/breakage. In a camera, that part is the shutter. Besides the shutter, the lens, display, battery and health of the memory card are things to look at before you buy a used camera. Pose the below questions to the current owner before you make up your mind:
  • Shutter cycles/shutter actuations: this refers to the number of times the shutter has been opened/closed or in simpler terms, the number of pics clicked. It is a good idea to not buy a camera that has clocked more than 1lac shutter actuations. Check out this website for a short list of some cameras and their recommended lives based on shutter cycles. Here is a discussion on the same topic.
  • Damage to the lens: hold the lens at varying angles to the eye in sufficient light and try to look for scratches/fungus marks on it. If the lens looks damaged, just run..run like the wind :)
  • Battery: has a batter leakage occurred in the past, while the battery was inserted in the camera? If yes, had any damage occurred to the camera? This is a question that only the owner will be able to answer.
  • Memory card: how old is it? What is the speed class of it? Does it have any bad sectors?
So unless the current owner is a trustworthy friend who wouldn't be in the process of offloading his burden onto you, I would not recommend spending heavily on used equipment since we are not talking about a few hundred Rupees here. 

Pros:  genuine user-feedback (if seller is trusted) on the equipment; low price
Cons: its a used device so may not carry warranty & can break down/under-perform as compared to a new piece

* Jugaad
If you know anyone inside the manufacturer company (Nikon, Canon for example), you can ask him/her to get it for you. Manufacturers usually offer discounts to their employees which maybe equal in amount to all or may vary depending upon the pay-grade of the employee. I procured a lens through this channel and effectively got a discount of 25% (9k instead of 12k).

Pros: price
Cons: none

* US se aya mera dost
This is my preferred channel when it comes to most pricy electronics! A Nikon camera cost me 10k less in the US as compared to India, while I got a lens for 30% less. But before you ask your friend to buy it there, ask him/her to confirm that the purchase comes with international service warranty. Do not miss out on the warranty for want of a discount.

Pros: price
Cons: waiting time

Renting equipment
You can explore this option if you want to test the equipment before you buy it, or if you need the accessories for a few days for a job. Toehold is one such company in Bangalore that rents out equipment at affordable prices.

If you can think of more options, please do let me know and I shall gladly update the post. I hope that this article has been able to help you gauge the pros-and-cons of the different channels.

Happy Clickin!
Sid