26 February 2012

Let's get technical - Focal Length

If you own or plan to own an SLR camera, you would be exposed to the standard lens nomenclatures which define your lens' capabilities. Consider for example, the kit lens on most cameras - the 18-55 lens. In a Nikon you would come across the 18-55mm VRII f3.5:5.6 lens. In this article, we will discuss what the "mm" in the 18-55mm stands for and how it affects your clicks. Note that the focal length-range is also specified on the lenses of compact digital cameras.

Focal Length
In optics, it is defined as the distance between the vertical center of the focusing lens and the focal point. As can be deduced from the below image, closer the lens comes to the sensor (focal plane), lower the mm figure goes (focal length) and wider the image.


Image Courtesy: dptips-central.com
Crop Factor
Camera bodies are basically of 2 types - full frame and cropped sensor. In case of the latter, a cropping factor comes into play, which is somewhat equivalent to 1.3. So an 18mm wide angle lens on a cropped-sensor body will yield a focal length of 18 x 1.3 = 23.4mm. Hence, if you want to harness the real power of wide angle lenses, no cropped-sensor body will give you that like a full frame body would :)


Classification of lenses
Based on the focal length of the lens, it can be classified under one of the below categories:

  • Prime: this lens has a fixed focal length. For example, the 50mm f1.8 Nikon lens
  • Zoom: any lens that has a range of focal lengths (you can zoom in/out) comes under this classification. For example, 18-55mm f3.5:5.6
  • Wide angle: a lens that provides an eventual focal length of 35mm or below is called a wide-angled lens. Please note that in case of cropped-frame camera sensors (Dx in case of Nikon and APS-C for Canon), presence of the cropping factor means that your 35mm lens is not actually an 35mm lens and hence is not a wide angle lens.
  • Super zoom/telephoto:  with focal lengths beyond 135, a lens can be considered to belong to this segment.
The below snapshot is of a Nikon Dx 18-55mm lens. So the next time you look at a lens, I hope you won't be puzzled about the meaning of these golden colored letters :)
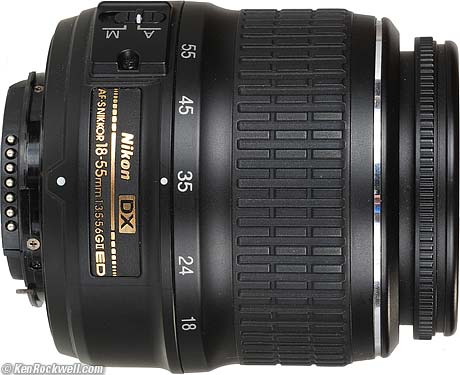
Image Courtesy: kenrockwell.com

Prime Lenses
If you are wondering why one would settle for a prime lens, which is no less expensive than a decent zoom lens, then I can answer that for you. A prime lens has lesser components as compared to a zoom lens (sometimes a zoom lens has upto 35 lens components in it) and hence have less negative effects on the image capture process. Due to multiple components in a zoom lens, the light entering the lens is reduced by the time it reaches the sensor. Also, zoom lenses work best at the mid-range; an 18-200 lens would would best at around 125mm while it would create problems like distortion at the extreme ends of 18 and 200 mm. Also, due to architectural provisions/restrictions, a prime lens can offer you a much wider aperture of 1.2 or 1.8 mm which is almost not possible in zoom lenses (most zoom lenses have a min aperture of f3.5). A focal length of 1.8mm yields a much shallower dof which is awesome for portrait photography.

In this image, do you notice the shallow dof? The face of the guitarist is in focus while even his hands which are quite near to his face are out of focus, not to mention areas farther away (the end of the guitar and the cushions). This was shot with a 35mm f1.8 nikon lens. If i were to shoot this with an 18-55mm even at f.3.5, the dof would have been much deeper and the focussed area would encompass more of the guitar, thus stealing attention from the guitarist and confusing it with the guitar.

27 January 2012

Let's get technical - Dynamic Range & Histogram

In statistics, a histogram is a graphical representation showing the distribution of data. In photography, a histogram shows the distribution of colors across the dynamic range of the camera or the color set of the image. Almost all cameras have a histogram display feature in them today, thus allowing you to judge whether your image is correctly exposed or not. To correctly understand histograms, you'd need to compare different images and their histograms. This post will simply help you understand what the graph on your screen says and whether you should listen to it all or not.

To understand histograms, let me first skim through the concepts of dynamic range and contrast ratio.

Dynamic Range
Each camera has a limit to the number of color/light levels that it can capture. This is called the Dynamic Range of the camera. Technically speaking, Dynamic Range describes the ratio between the maximum and minimum measurable light intensities (white and black, respectively). Let's try to understand this concept.

The sensor captures data in an analog form. This analog signal is then converted into a digital signal and sent to the camera's processor. Let's assume that the processor accepts an 8bit signal. So each pixel on the sensor sends out the pixel color/intensity information as an 8bit signal to the processor.

With 8 bits to represent each pixel signal, we end up with 28=256 levels of intensity within which this signal can lie. As shown below, a histogram in an 8bit digital camera shows the spread of different pixels between the darkest (0) and brightest(255) light intensities. Simply put, a histogram's vertical axis shows how much of the image is found at a particular brightness level. Here we can see that the image has more dark areas than bright. 

Coming back to the topic of dynamic range, a camera which uses more bits for encoding the analog pixel signal into a digital signal will have a wider bright-to-dark light spectrum and hence will capture colors more accurately at different light intensities.

Contrast Ratio
Some manufacturers or comparison websites express the camera's dynamic range with the term "contrast ratio". This number will look something like "1000:1". So how should we look at this concept?

Assume each pixel to be a bucket; a bucket that collects light photons. The more photons that a bucket collects, the brighter than bucket becomes. Now each bucket has a limit to the number of photons it can collect (and report to the camera processor). This depends on the number of bits used to convert the analog signal to digital. Let's assume the camera uses 8 bits which means the bucket can contain a maximum of 256 photons beyond which it will overflow (be overexposed). The lesser the photons, the darker the image.

Image courtesy: cambridgecolor.com
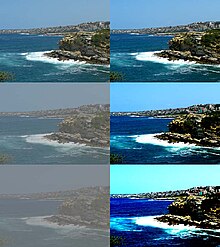
Contrast is the ratio between the brightness and darkness levels of the image. The lower the contrast, the more dirty/lacklustre/dusty the image looks; as you increase contrast, bright areas become brighter and dark areas become darker thus giving the image more clarity until a point beyond which the image starts looking unnatural. In the below image, starting from the lower left corner image (this image has the lowest contrast) you can see that as the contrast level is increased the dusty feel of the image starts wearing off and the image becomes more bright/sharp and clean. As we move clockwise towards the lower right image, the contrast levels have been increased too high to give the image an unnatural feel.

Image Courtesy: wikimedia.org
A contrast ratio of 1000:1 means the camera uses a minimum of 1 photon in a pixel to represent the darkest area as compared to a 1000 photons to represent the brightest area. The more the maximum number of photons that can be captured by the pixel, the larger the range of intensities that the sensor can capture. So a higher contrast ratio is always better since the camera will yield a higher dynamic range (provided the number of bits used by the camera for representing the light signal doesn't act as a limiter).

So to summarize, Dynamic Range/Contrast Ratio is the ratio between the maximum and minimum measurable light intensities.

How does dynamic range relate to histograms?
If you have accurately understood the point that I am trying to drive home, you may have realized that dynamic range forms the X-axis of the histogram - the range of brightness levels that the camera can capture :)
As the dynamic range increases, the width/number of intensity levels of the histogram increases and hence the graph becomes a more accurate representation of light intensities.

How does a histogram help?
There is nothing called a "good histogram". A histogram only tells you whether the image has too many pixels at a particular brightness/darkness level or if the intensities are well spread out. Knowing this helps you avoid posterization during post-processing and helps gauge whether the image is over/under exposed. How do you judge the below histogram?

Image courtesy: luminous-landscape.com
If you do not look at the image and only check out the histogram, your knee-jerk judgement would be that it is a bad image, won't it? :) But histograms are certainly useful, as can be seen in this post.

12 January 2012

Keep it RAW!

Advanced cameras can capture and save images in JPEG as well as RAW formats. Though RAW format consumes more carpet area on your memory card, it is wonderful and may I say, the only option for post-processing. Let's have a look at why JPEGs are bad for post-processing/image correction.

How does the digital camera create an image?
Your camera sensor senses the incident light along with its different aspects like brightness, contrast, hue, the colors in it and many other things and applies a sophisticated algorithm to process all this detail and save it as an image on your memory card. This image can be saved with a lot of information or with minimal information so as to reduce the file size. If you save all the information possible, you can then selectively remove/polish/modify selective aspects of the saved image in an image editing program to yield desired results. If you remove much of the information and retail only as much as required for the image to be created with near-to-real reproduction, then you would achieve a much smaller sized email image which you can't do almost any post-production on. The previous type of image is called a loss-less image (RAW for example) while the other type is called a lossy image (JPEG).

What is a JPEG?
JPEGs were created as a web-friendly solution for images. Before JPEGs came into existence, the world worked with BMP images (which are quite rare these days but if you had a windows 95 PC, it did not recognize JPEGs; you had to install special software to work with JPEGs) which is an acronym for BITMAP. In BMP images, each pixel's color information was saved in the file. So if you have 1024x768 pixels in the image and each pixel took x bytes to save, you'd end up with 786432x bytes for one image. I remember BMP commonly weighing between 4-10 MB each. You can't have such heavy images on a webpage!

Enter the JPEG! It's an acronym which stand for Joint Photographic Experts Group, the geniuses who used their mathematical prowess to revolutionize image persistence and shrunk the 4MB BMP to a 100KB JPG!

Because JPEG employs a lossy compression technique, every time you open a JPEG and save it through a CTRL+S, it is compressed and saved. So each save compresses it further and leads to a further reduction in detail. So if you want to photoshop your images, JPEGs are not the ideal solution even if you save them in the highest resolution possible.

Lay it RAW!
RAW is not an acronym - it simple hints at the fact that the image has undergone minimal processing between the point of capture (sensor) and point of save (memory card). As such, it contains maximum optical information possible. Each manufacturer has his own RAW file format which needs you to install manufacturer-specific software/drivers to view the RAW image. Nikon uses the NEF file extension while Canon uses the CR2 extension.

Why should I use RAW?
There are multiple reasons for which you should shoot in RAW provided you are adept at using post-processing tools like GIMP/Photoshop or any other sophisticated image editing software.
  • White balance correction: if you have shot an image with incorrect whitebalance settings, you can use a RAW editing program to make the correction. In the below image, the upper section has correct whitebalance while the lower one has a warm tinge.
Image Courtesy: phottix.com
  • Exposure correction: if you image is over/under-exposed, you can make corrections to get correct exposure. The below screenshot shows an over-exposed sky in the RAW image at the bottom with the corrected sky above it. This level of exposure correction is not possible in JPEGs.
Image Courtesy: kelbymediagroup.com
  • JPEGs store information in 8bit format while RAW store in 12 to 16 bit format which leads to an amazing difference in the quality of image detail. Due to this, any of the processing done to a RAW file yields a better final image as compared to changes done to a JPEG.
  • Many alterations/corrections like brightness, saturation, hue, contrast, color correction, gamma correction, sharpening, noise reduction, etc should be ideally performed on RAW images only.


Ok what's the catch?
With all due respect, RAW is not for everybody. Don't shoot in RAW just because I said it yields better and sharper images. If you don't intend to do post-processing on it, it's just not worth the hassle since you will be simply converting them to JPEGs for circulation/distribution and you personal archive anyway :p
  • RAW needs manufacturer specific drivers/software installed to read the RAW file. For example, windows cannot read the NEF file (Nikon). You can access it through Nikon's RAW software or through third party tools like Adobe Lightroom which is a RAW editing software.
  • File size: RAW files are typically 4-6 times the size of the biggest JPEG that your camera can save. That means 1/4th-1/6th the number of photos that your camera can save. So if your card can save a max of 100 JPEGs of the highest resolution, it can save less than 25 RAW files!
  • RAW process workflow takes up quite some time for even the simplest operations: if you shoot 200 images in your brother's wedding and need to load them in a RAW processing tool, make corrections to them and save as JPEG - you'd need a fast processor, multiple hands like a demigod and multiple screens on which you can execute this shit in parallel to get it done in one day! It takes me upto a week to process RAW images of one photoshoot!
  • And of course, you need sufficient knowledge about the RAW processing tool too!
 I shoot in RAW, process in Lightroom and then polish in Photoshop to finally achieve the desired JPEG. Each image takes anywhere between 45-90 mins. You don't need to treat each image with such tender care and loving but if you have that kind of patience, stay RAW!