11 March 2012

Let's get technical - Wadda Focus!

Almost a decade ago, when I got my hands on the new kid on the block - the digital camera, a feature in it that marked a major shift from film-photography was the auto-focus (AF) mechanism. The camera has some  intelligent and sometimes bewildering intelligence in it, one such mark-of-a-genius trait being the AF mechanism. Have you ever wondered how the camera achieves such sharp focus effortlessly, while being equally stubborn at other times? In this post, let's look at how the AF mechanism works, thus moving a step closer to understanding your camera and avoiding embarrassing moments when it refuses to focus on your friends :)  


Types of Auto-Focus (AF) mechanisms
AF mechanisms are broadly classified as either ACTIVE or PASSIVE. In the former mode, the AF mechanism emits waves, infrared or infrasonic (like a submarine's SONAR) and gauges the distance between the lens and the subject. The passive mechanism is named as such because there are no signals sent from the camera to the subject for calculating the distance between the lens and subject; instead the AF software inside the camera analyses the image to achieve optimal contrast obtained at different positions of the focusing ring. Most of the contemporary cameras use the passive mode because of the problems inherent in the active mechanism.


Active Mechanism
There are multiple problems associated with the active mechanism, which are aggravated when you are not in control of the environment. 
  • Infrared interference: if the AF mechanism uses IR rays for calculating the distance, an attempt to focus near a halogen bulb or fire or a candle would throw the AF mechanism off balance.
  • Transparent surfaces: using SONAR for calculating the distance would ruin the focusing attempt, were a glass or windshield to be introduced between the camera and the subject since the sound waves would bounce off the glass instead of reaching the subject.

Passive Mechanism
The passive AF mechanism quickly changes the focus a few times and compares the contrast of the images obtained. Based on which focus setting offers the best contrast, the camera chooses that as the optimal focus. This is based on the fact that a sharply focused image shows higher contrast than a poorly focused image. Well, as true as that maybe, only a genius could have tapped into such an obvious fact and used it as a means of focusing. Hats off to such Einsteins!

So why doesn't my camera focus?
If you understand the meaning of the term "contrast", then it is pretty easy for you to understand why the passive AF mechanism may act stubbornly at times. Contrast is the difference between the light and dark areas/pixels in the image. If the contrast is low, the image does not look rich in color; it looks dusty or dull. As you increase the contrast, the darker areas become darker and bright pixels become brighter. Also, given an illumination setup, the image shows best contrast when sharply focused.

Compare the low and high contrast images below. Note the difference in color levels and hence, the clarity of the image.
High Contrast Low Contrast
So if your camera is letting you down on occasions, check the below list and see if any of these is the reason:
  • The frame is almost uniformly colored: this happens when you try to focus on a clear sky, single-colored and uniformly lit wall or object. Since all the pixels have almost the same values, the camera cannot identify the contrast level in the image and hence cannot perform contrast based AF. In the below image, I tried to focus on a white wall but could not because of the lack of contrast.
White wall
  • Moving subject: this happens if the subject is in motion while you are struggling to focus on it. Since the pixels are moving, the 2 images taken by the AF mechanism for comparing contrast cannot be used for comparison. In this case, you are better off focusing on something that is at the same distance from the lens as the subject is, and then keeping the shutter half-pressed (the focusing happens when the shutter is half pressed), move the camera to get the subject in frame.
  • Low light conditions: less light means more dark areas. The darker the picture, the less the contrast (remember, contrast required dark as well as bright areas) which stresses out the AF mechanism. I was unable to focus in the below image for lack of visible light. As such, the superman logo is out of focus. (though it is bright red, lack of contrast and complete lack of visible light scrambled the AF mechanism).
Low light conditions

AF-assist
If you turn on the AF-assist beam through camera settings, in low-light conditions the camera will emit a bright light through an emitter on the front of the camera body (usually its next to the lens) which is used to illuminate the subject, thus increasing light levels and helping the AF mechanism focus. So enabling this option will help you use the AF in low light conditions. Some cameras allow the option of using the camera flash for AF - this is termed as pre-flash in which the camera emits multiple bursts of the flash to illuminate the subject while focusing.


AF Assist lamp

How does my camera focus?
If you are curious to know which AF mechanism your camera employs, you can try this trick. Go outdoors and point towards the sky and try to focus on it. In case of active AF, the camera will mostly focus but in case of passive AF, given a clear sky (no clouds and no variation in color), the camera will not focus.

Some tips about AF
The focusing mechanism offers two modes for you to choose from - continuous and shoot-only. Should you choose the latter mode, the camera will attempt to focus only when you press the shutter halfway. This is good and recommended for situations where you take time to compose the picture (portraits, studio shoot, landscapes, etc). During sports or high speed photography though, you may want to switch to continuous focus mode so that the camera does not wait for you to half-press the shutter to begin the focusing process, thus introducing a lag between shutter press and image capture. In this mode, the camera keeps attempting to focus the frame, regardless of whether you are tracking the moving subject or simply waving the camera around while waiting for something exciting to happen.

The continuous mode keeps the camera on its toes and hence, consumes more battery and leads to faster wear and tear of the focus motor. So unless specifically required, work with the shoot-only mode.

28 February 2012

Creative Explosion - Perspective

With this, I start a new thread of articles which explore creativity in photography. Until now, most articles penned by me have been restricted to the threads "Let's get technical" and "Blasting the myths" which dealt with laying down the technical fundamentals and clearing the mist around photography resp. Along the way, I believe I have chalked out a sound understanding of photography and laid the foundation for the next generation of posts.

Perspective
Simplistically speaking, perspective is the spatial distance between objects in the image, that helps you judge the spatial placement/location of the objects and their heights/forms relative to each other. Perspective is affected by the focal-length & subject-to-lens distance combination. You can alter perspective by either moving around or by changing the focal-length of the lens or both.

A wider focal length creates more depth in the image (do not confuse this with dof) and makes the objects look farther away. A tele lens will make the objects look more closely located though in actuality they may not be, thus making the image look flat (less depth). I don't have an image to depict this phenomenon right now so I'll suggest that you visit this page to understand what I am blabbering about :)

How to alter perspective?
I'd say that more than focal length, it is the subject-to-lens distance that determines perspective. After all, change in focal length is an eventuality that follows when you change the distance. Unleash your creativity with perspectives by moving around the subject and clicking from various distances while maintaining the subject's height/width the same across images. You will notice that if you kneel down and click a standing person's pic from a close distance, the person looks gigantic as compared to his/her surroundings. This attributes a larger-than-life or a heroic feel to the persona of the subject. On the other hand, if you click the same subject by standing on a stool and looking down at the subject, he/she appears dwarfed, which creates a sense of suppression.

How perspective is used in movies
This is where the director of photography in movies/sitcoms comes into play. Using a telephoto lens, the director positions the actor far away from the lens. When the director zooms in on the actor through the telephoto lens, it looks like the oncoming truck is right in the actor's tracks and is going to overrun him when in fact, they are on parallel tracks made to look superimposed because of the manipulated perspective (zooming into an object from a distance flattens the perspective, thus making things look closer than they are). Also, when the director wants to show an actress/actor along in a dense area like a forest/garden, he uses a wide angle lens to introduce more depth in terms of perspective into the frame.

So choose a position because of what it does to the perspective; then choose the focal-length/zoom. The next time you click a pic, remember the "perspective" concept and put some thought into the composition of the image. I guarantee that you will like the entire process of photography even more down this road :)

26 February 2012

Let's get technical - Focal Length

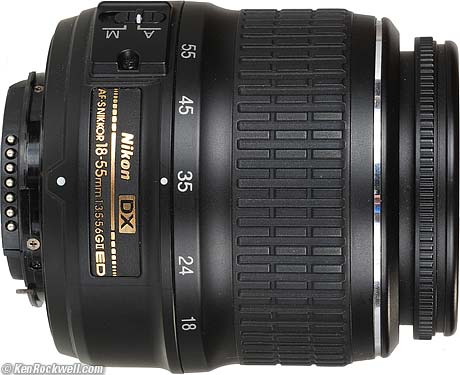
If you own or plan to own an SLR camera, you would be exposed to the standard lens nomenclatures which define your lens' capabilities. Consider for example, the kit lens on most cameras - the 18-55 lens. In a Nikon you would come across the 18-55mm VRII f3.5:5.6 lens. In this article, we will discuss what the "mm" in the 18-55mm stands for and how it affects your clicks. Note that the focal length-range is also specified on the lenses of compact digital cameras.

Focal Length
In optics, it is defined as the distance between the vertical center of the focusing lens and the focal point. As can be deduced from the below image, closer the lens comes to the sensor (focal plane), lower the mm figure goes (focal length) and wider the image.


Image Courtesy: dptips-central.com
Crop Factor
Camera bodies are basically of 2 types - full frame and cropped sensor. In case of the latter, a cropping factor comes into play, which is somewhat equivalent to 1.3. So an 18mm wide angle lens on a cropped-sensor body will yield a focal length of 18 x 1.3 = 23.4mm. Hence, if you want to harness the real power of wide angle lenses, no cropped-sensor body will give you that like a full frame body would :)


Classification of lenses
Based on the focal length of the lens, it can be classified under one of the below categories:

  • Prime: this lens has a fixed focal length. For example, the 50mm f1.8 Nikon lens
  • Zoom: any lens that has a range of focal lengths (you can zoom in/out) comes under this classification. For example, 18-55mm f3.5:5.6
  • Wide angle: a lens that provides an eventual focal length of 35mm or below is called a wide-angled lens. Please note that in case of cropped-frame camera sensors (Dx in case of Nikon and APS-C for Canon), presence of the cropping factor means that your 35mm lens is not actually an 35mm lens and hence is not a wide angle lens.
  • Super zoom/telephoto:  with focal lengths beyond 135, a lens can be considered to belong to this segment.
The below snapshot is of a Nikon Dx 18-55mm lens. So the next time you look at a lens, I hope you won't be puzzled about the meaning of these golden colored letters :)
Image Courtesy: kenrockwell.com

Prime Lenses
If you are wondering why one would settle for a prime lens, which is no less expensive than a decent zoom lens, then I can answer that for you. A prime lens has lesser components as compared to a zoom lens (sometimes a zoom lens has upto 35 lens components in it) and hence have less negative effects on the image capture process. Due to multiple components in a zoom lens, the light entering the lens is reduced by the time it reaches the sensor. Also, zoom lenses work best at the mid-range; an 18-200 lens would would best at around 125mm while it would create problems like distortion at the extreme ends of 18 and 200 mm. Also, due to architectural provisions/restrictions, a prime lens can offer you a much wider aperture of 1.2 or 1.8 mm which is almost not possible in zoom lenses (most zoom lenses have a min aperture of f3.5). A focal length of 1.8mm yields a much shallower dof which is awesome for portrait photography.

In this image, do you notice the shallow dof? The face of the guitarist is in focus while even his hands which are quite near to his face are out of focus, not to mention areas farther away (the end of the guitar and the cushions). This was shot with a 35mm f1.8 nikon lens. If i were to shoot this with an 18-55mm even at f.3.5, the dof would have been much deeper and the focussed area would encompass more of the guitar, thus stealing attention from the guitarist and confusing it with the guitar.